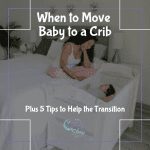
There are many amazing baby sleep products. If you’ve landed here, I assume your baby has been sleeping in the SNOO and hopefully, you have found the SNOO worth it. But, all good things come to an end. This post will review how to wean and transition from the SNOO to the crib.
When to Transition From SNOO to Crib
The SNOO is designed to be used until your baby is up to 5 to 6 months old. But, that means you need to start weaning from the SNOO before your baby’s fifth or sixth month birthday.
Obviously, you might decide to transition sooner. If it’s because you feel your baby is outgrowing the SNOO, keep in mind that it was designed for babies as big as a 9-month-old in the 90-95th percentile. Worried your baby doesn’t like it anymore? I highly recommend you experiment with the settings just in case he has “outgrown” a softer movement.
If you decide to transition, just like many transitions, I recommend you start 3 to 4 weeks before your desired goal. That way, if things don’t go smoothly, your baby gets sick, your baby is sensitive to changes, or something else thwarts your plans, you have plenty of time without as much stress.
3 Things to Do Before You Transition From SNOO to Crib
Before you transition from SNOO to crib there are 3 things you might want to consider doing to make it a smoother transition.
1. Introduce the Crib During Awake Times
Familiarity is your friend when it comes to a new sleep space. Try to have your baby spend time in the crib during playtime during the day. You might turn on some upbeat music or a crib toy. Play peek-a-boo or sing. While your baby might only last a few minutes at first, after doing this several times a day for a few days to a week, he or she might start to like it!
2. Move the SNOO to the New Room (if applicable)
It is recommended to share a room with your baby for the first 6 months to a year to reduce the risk of SIDS. If you have chosen to move your baby to their own room as part of this transition, you might want to try moving the SNOO to the “new” room, temporarily. You can also set up a makeshift bed or air mattress for you to sleep on while in the same room. This way, you are familiarizing your baby with the room before you transition to the crib.
If you have decided to continue sharing a room with your baby, you might consider where to put the crib and move the SNOO to that location if it’s not already.
3. Make a Decision About White Noise
One of the key features of the SNOO is the built-in white noise. Since you won’t be using the SNOO anymore, you might want to consider whether you want to wean from white noise altogether or use a new white noise source. There are many options for white noise, now, including our free white noise downloads. Here are also a few products we like:
White Noise Products We Love
Yogasleep Dohm White Noise Machine
Nothing fancy and not very cute, but simple and effective! And, they have a portable white noise machine, too.
Bubzi Co Baby Sleep Aid
Okay, so it’s not just a white noise machine…it’s a white noise machine, night light, and lovey rolled into one cute little device!
LectroFan High Fidelity White Noise Machine
This is one serious white noise machine. It boasts 10 different fan sounds at varying frequencies, and its volume is incredibly precise, making it easy to adjust your white noise based on what’s happening in your home at any given moment. You can let this machine run all night long, or you can use the built-in timer for automatic shut-off.
Now that you’ve prepared for the transition from SNOO to crib it’s time to get going! Here is an easy 5-Step Process:
Step 1: Stop Swaddling
The SNOO has a built-in swaddle, but more than likely, it’s time to stop swaddling baby. By now, your baby is probably ready to roll over, and it will be unsafe to be in a crib swaddled.
Before moving your baby to the crib, practice being unswaddled. While still in the SNOO, unswaddle your baby’s arms. This way, your baby can get used to having their arms free but the SNOO will still automatically respond to your baby’s fussing and crying just as it always has. You may or may not need to soothe the baby more for a few nights, but hopefully, within a few nights to a week, your baby will be used to being unswaddled and sleeping just as well as before in the SNOO. If not, move forward anyway.
Step 2: Wean Motion Gradually
The SNOO has a weaning mode you can turn on using the app. This mode will wean your baby from being dependent on movement to sleep. However, there are a couple of things to consider, however.
With the weaning mode on, the SNOO will use white noise but will NOT use continuous motion all night to keep your baby asleep. However, if your baby starts fussing or crying, it will respond with motion. This is a good first step. But, there’s more to consider.
You imagine the SNOO putting your baby to sleep at bedtime using motion and then every two hours all night. This can still be a dependency that your baby might have when in the crib. Therefore, I recommend you consider a couple of other steps:
First, make sure you put the motion limiter on so the SNOO will respond to your baby’s fussing and crying but with less intense motion than before. This will help wean them more fully from movement.
The last step you can do is lock the motion at one of the lowest levels of movement, so the SNOO can never go above that level. For example, if your baby has been dependent on some higher levels of movement, you might lock the level at Level 3 for 2 days, then Level 2 for 2 days, then Level 1 for 2 more days.
Step 3: Turn Off the SNOO
One more thing before you move to the crib. I recommend taking a test drive without the SNOO. Turn it off completely for 2-3 days before you move baby to the crib. Or, for a more gradual process, you can turn it off at bedtime and then turn it on later on in the night, if needed. The closer you get to the morning, the more difficult sleep can be for your baby. So, feel free to work your way up to not needing the SNOO for the entire night. It will be a good investment of 3 to 7 days.
Step 4: Introducing the Crib
It’s time to start introducing the crib. Some parents will start naps in the crib and keep the SNOO at night. But, remember, day and night sleep are handled by two different parts of the brain, so it might not make any difference.
To introduce the crib, you can try to put your baby down for bed normally but this time in the crib instead of the SNOO. Don’t be alarmed or surprised if it doesn’t go well, at first. It’s similar to adults going to a hotel. The first couple of nights are the worst sleep for many of us. But, as the days go by, the bed starts to feel more like your own. Your baby will start to feel like the crib is their bed.
For a more gradual process, feel free to move the baby back to the SNOO later in the night, if necessary. What starts as an hour or two might quickly increase to many more hours. It’s okay to take your time.
If your baby fusses or cries, you might need to do some gentle sleep training.
Step 5: Transitioning from SNOO to Crib Completely
The final step to transition from SNOO to the crib is to keep your baby in the crib all night and for all naps. If you are struggling to say goodbye to the SNOO, move it out of the room so you’re no longer tempted to use it. Some devices we become dependent on just as much as our babies!
I hope these tips have been helpful in the transition from SNOO to crib. Give your baby a week or two, and I’m sure your baby will be sleeping through the night in no time. If not, we’re here to help by offering sleep training services!